Leader Tool

Getting Started  Previous  Next

The leader tool is responsible for creating Leader Entities


Creating a Leader:

From the Toolbar: Find the leader tool icon ssEntityLeader on the Entity Toolbar (color coded blue) and Click on the tool. The tool is now active and ready for use.

 
From the Shortcut Key: The default shortcut key for the point tool is the letter "L". Simply press the key and the tool will be activated.

 
From the Command Line: Type "leader" into the Command Line, at the top of the notification window, and press the Enter/Return key.


1. Click on the drawing screen to designate first vertex where the arrow will point.

2.  Continue to click on the drawing to place the vertices that design the stem of the leader.

3.  Press keyboard_20 Shift+Enter to finish and add the leader to the drawing.


Reset:

You have just added a leader to the drawing. The tool automatically resets and you can either continue with other tools or add another leader.
Using reset (Space Bar) at any time while using this tool cancels all previous steps and restarts the tool.


To add a leader using typed data open the Tool Tab in the property tree.

ssLeaderToolProperties


1.  Type the coordinates for the location of the leader's arrow in the into the "Current Point" 3D Point Property Field found on the Tool Property Tree and press Enter to accept. This will add a the first vertex of the leader which is where the arrow head points, and then these coordinates will be bumped to the Previous Point value.

2.  Continue typing in coordinates into the "Current Point" field to place the leader's stem's vertices.

3.  Press keyboard_20 Shift+Enter to finish and add the leader to the drawing.


Reset:

You have just added a leader to the drawing. The tool automatically resets and you can either continue with other tools or add another leader.
Using reset (Space Bar) at any time while using this tool cancels all previous steps and restarts the tool.


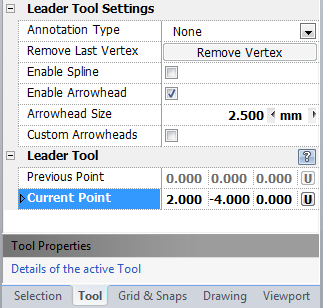
Annotation Type: Select the type of annotation to appear at the end of the leader stem.

       Select Block:  Select the block to display at the end of the leader's stem. (Only visible if annotation is set to block.)

       Text: Input the text to display at the end of the leader's stem. (Only visible if annotation is set to text.)

Enable Spline: Toggle the appearance of the leader. If enabled, the stem of the spline will be a smooth curve.

Enable Arrowhead: Enables the arrowhead at the front end of the leader.

Arrowhead Size: The size of the arrowhead (Only visible if Enable Arrowhead is checked.)

       Custom Arrowheads: Enable user specified arrowhead. (Only visible if Enable Arrowhead is checked.)

               Custom Arrowhead Block: The list of available blocks to use as an arrowhead. (Only visible if Custom Arrowheads is checked.)


mouse_20 Right Click: Brings up a Context Menu containing options for this tool.

keyboard_20 Shift + Enter: This keystroke will complete and add the leader to the drawing.

keyboard_20 Escape (Esc): Cancels current tool and activates the default tool (Selection Tool).

keyboard_20 Space: Resets this tool.


Also See:

3D Polyline

Grid

Grid Snaps

Entity Snaps

Notification Bar