The xline tool is responsible for creating Xline Entities.
From the Toolbar: Find the Line Tool icon  on the Entity Toolbar (color coded blue) and Click on the tool. The tool is now active and ready for use. on the Entity Toolbar (color coded blue) and Click on the tool. The tool is now active and ready for use.
From the Shortcut Key: The default shortcut key for the this tool is the letter "X". Simply press the key and the tool will be activated.
From the Command Line: Type "xline" into the command line, at the top of the Notification Window, and press the Enter/Return key.
|
| 1. | Click on the drawing screen to set the base point at that location. |
| 2. | Specify the directional point in the same manner. |
Reset:
| • | After working through the necessary steps the line entity is added to the drawing. The tool automatically resets and you can either move on to other tools or add in another line entity. |
| • | Using reset (space bar) at any time while using this tool cancels all previous steps and restarts the tool. |
|
To add a line entity using typed data open the Tool Tab in the property tree.
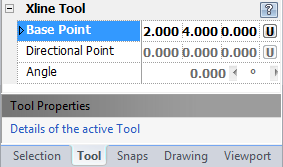
1. Type the base point point coordinates into the "base point" 3D Point Property Field found on the Tool Property Tree and press enter to accept.
2. Type the directional point coordinates into the "Directional Point" field found on the tool property tree and press enter to accept.
OR
Type the directional angle degrees into the "Angle" Scientific Data field.
Reset:
After working through the necessary steps the line entity is added to the drawing. The tool has now reset and you can start adding another line entity if desired. Using reset (Space Bar) at any time while using this tool cancels all previous steps and restarts the tool.
|
 Escape (Esc): Cancels current tool and activates the default tool (Selection Tool). Escape (Esc): Cancels current tool and activates the default tool (Selection Tool).
Space: Resets this tool.
|
Also See:
Line Entity
Grid
Grid Snaps
Entity Snaps
Notification Bar


